![<?echo $_SERVER['SERVER_NAME'];?>](/template/twentyseventeen/skin/images/header.jpg)
Types of Maps There are a variety of maps available on the market. There are maps of the country's administrative divisions, and there are street maps of the city. Tickets for tourist attractions often have maps of attractions. But in outdoor sports such as mountaineering and off-road, what you need most is a contour map. It can tell you where there are mountains, where are the cliffs, where there is water for camping and so on. You can even imagine the various landforms that may be experienced during the journey and confirm them in the actual climbing process.
In the direction of the map, North, South, Left West, and Right East are the directions of most maps. However, this is not a general principle. If there are directional signs on the map, they can be known through the direction signs. In practical applications, you can turn the map to a certain angle, align the target on the map with the direction of the target in the field, feel comfortable, and quickly determine your position.
The scale map cannot be the same size as the actual object, and the scale of the two is the scale. There are three common types of scale: digital, such as 1:100,000; text, such as 1CM (cm) on the map is equivalent to 10KM (kilometers) in the field; graphical, such as the linear scale. When working in the field, try to map with a large scale. (The larger the second number in the digital scale, the smaller the scale. On the contrary, the smaller the second number, the larger the scale).
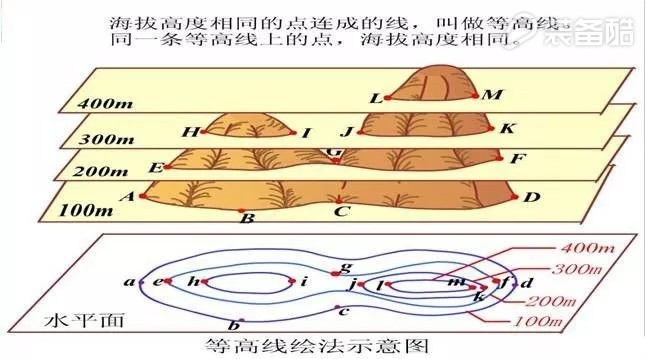
Contour lines As the name suggests, the contour lines connect the same points on the map with similar elevations. Although this is an imaginary line, the rough terrain can be understood by observing the density of the contours: the slope is gradually reduced where the contours are sparse, and the slope is steep when the contours are dense; above the contours The pitch is smaller than the lower pitch for the concave slope, and vice versa for the convex slope. Contour lines are usually printed in brown and include the first curve (thin solid line from the zero point for the basic contour distance), the gauge curve (solid line for bold height), and the inter-curve (adjacent contours) The long dashed line between the lines to supplement the mapping), the assistant curve (at any height, a short dashed line depicting important minor changes), etc. On the color topographic map, some colors have been added to record the elevation changes. Generally, the higher the elevation, the darker the color, until it is dark brown.
The legend is a note on the map used to indicate the meaning of various symbols. For climbers, the most attention is on cliffs, cliffs, mountains, glaciers, rivers, lakes, etc.
Practical exercises
First, can't find North in the wild. How many ways do you know to determine the North?
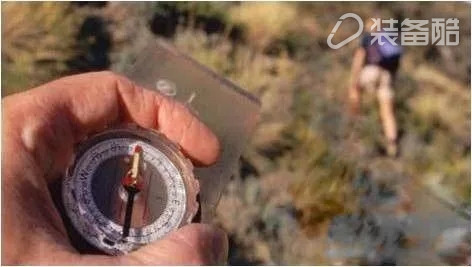
1. The simplest method is to use a compass needle. Keep the north arrow flat and the red pointer will point north. During the test, please be sure to have taken away or away from the pocket knife, iron backpack buckle, rail, truck, wire, etc., otherwise it will affect the test results of the compass. It should be noted that the "North" indicated by the compass needle is not really north but only magnetic north. In general, there is only a slight difference between the two, but it is necessary to know the magnetic declination (usually marked on the topographic map) in the field orientation, and make certain adjustments, which should not be neglected. In addition to some magnetic anomalies in China, the general magnetic declination is west. The magnetic declination still changes regularly, and the magnetic declination on the map is only the magnetic declination when surveying (pay attention to the map publishing time), and it is only the average of several points on the map. Be aware.
2, can also use the watch to determine the direction (hereinafter referred to in the northern hemisphere's method and direction). One is to take the watch off the top and use the hour hand to point to the sun. The bisector between the hour and the 12 o'clock is the south. Or divide the test time (calculated by 24 hours) by 2, and then calculate the clockwise direction to align with the sun. At this time, the point pointed to by 12 o'clock is the north.
3, you can also use the shadow to determine the direction. Using a straight rod, stand vertically on the open ground. Record the position A of the straight shadow shade vertex with a stone. After about 10 minutes, the shadow moves along with the position of the sun. Record the position B of the shaded vertex with stones. The points are connected in a straight line. The line points in the east-west direction. The line perpendicular to this line AB points north and south, the side facing the sun is south, and the opposite direction is north. In this orientation, the straighter the rod, the finer, the more perpendicular to the ground, the closer to 12 o'clock noon, the more accurate the measured direction.
4, other methods. In addition, there are many ways, but to confirm each other, can not make mistakes. The sun rises east to west, and in the northern hemisphere, it observes the sky in a southerly direction, which can also determine the approximate north; the front of the Big Dipper “bucket†has two stars, and it can be found by extending the two stars four times. In the direction of the north, the snow melts toward the south. The relatively dense annual ring on the stump faces the north, the relatively lush foliage faces the south, the rough bark faces the north, and the moss grows on the north of the stone. Generally speaking, facing north to the south, the gate of the mosque faces the east (the worshipers face the west). In northwestern China, the dunes generally extend from northwest to southeast, and the doors of the yurt generally face the southeast of the leeward....
Second, do not lose yourself
1. Observe carefully to find markers. In general, when you are lost, you do not know your location (on the map). You need to use maps and compass to determine the location. Choose a place with a wide field of vision. Look closely to find two obvious landmarks, such as peaks, river bends, and villages. You can find these two points on the map and measure the first marker A with a compass. In the orientation, draw a line in the direction of the reference object from point A on the map, and you are on this line. Then the direction of the second marker B is measured. At point B, a line is also drawn along the position. The intersection of the two lines is where you are. If the local magnetic declination is too large, the magnetic declination should be added or subtracted (magnetic Norther than true Norther left, plus magnetic declination; magnetic Norther than true Norther deterrence, minus magnetic declination; generally added in our country ). Using the third marker to verify this result will be more accurate.
2, the use of northerly orientation. The commonly used compass direction usage can be understood graphically. The north-south pin of the transparent floor is referred to as the forest compass. It is a weapon that is oriented in mountaineering and off-road. Prism Northing is more accurate because it has a lightable dial that can also be used for night orientation.
3, find the road. Once you have established your position, you must look for a way. The most conservative and reliable method is to “get lost and get back on the go.†Going back to your original route requires more courage and perseverance than going forward; if you are on a road that has not been recorded on a map, you must judge it. , This is the new road, beast road, engineering road or other climber's road, etc. Analysis of the disadvantages of each road carefully or resolutely give up.
4. Determine the distant goal. You have discovered a distant mountain, want to know its location and also want to know the approximate straight line distance in order to climb. At this time, you must measure the azimuth of the mountain B at your own location A, and then draw a line of orientation on the map at point A. Walk for a while to reach another location C on the map. Measure the azimuth of the mountain B, and draw a bearing line at the C point. The place where the two lines meet is the position of the hilltop B on the map, and then the straight line distance between B and C can be measured with the forest compass with scale and scale.
Third, crossing
1, design route At this time to consider the main factors are: the companion's physical condition (to consider the weakest body), travel goals, withdrawal routes, landforms, obstacles, water, camping sites. Include the initial target route, the adjusted route, and the final route, and carefully analyze their changes.
2, ranging (1), usually can use the wire to measure distance, because there are few straight crossing routes. You can place one end of the thread on the starting point and try to match the thread and the route to the end point. Then use a ruler to measure the length of the thread. If there is no ruler, measure the length with your own hand width and finger width (to be known in advance). Then you can get the distance by using the scale on the map. Be careful to leave room.
(2) It is also convenient to use white paper for distance measurement. Take a piece of white paper and align the corner with the starting point. Align the edge of the paper with the alignment. Mark the first corner with a pencil. Then rotate the white paper and re-conform with the road. Mark the second turn until the entire road is Finished drawing. When you mark a road, you can indicate the topography of a steep slope or mountain, and then you can calculate the distance accurately based on the scale.
Fourth, the map to carry
1. Everyone who participates in field activities should carry a map. Because nature is changing, even the most experienced players cannot understand everything. Intuitive judgment can be extremely dangerous. Maps that you carry can copy important parts and keep them separately to avoid loss.
2, the map is best placed in the chest pocket. Some people use the tape to seal up the map. This is a very practical method. At a minimum, you should put the map in an impermeable plastic bag to avoid getting wet when it rains or crossing the river.
3. Use different colored highlighters to mark routes, streams, camping areas, etc. on the map so that they can be searched accurately and quickly when the lights are dim.
4. After the map is lost, it is necessary to borrow the map of the partner as soon as possible and use the rest time to draw a simple map. If it is a person, then you can only look at the tourism and tourist brochures or see detailed notes of your own actions.
How to find a map that is more suitable for you?
1. Choose a map according to your purpose of use. If you are hiking, you should prepare a professional mountaineering map. If it is a general tourist, you can see the map.
2. In the age of publishing, the age of the map was an important measure of the quality of the map. Don't forget to check out the purchase map.
3. Scope In general, the smaller the map is, the more detailed it is, for example, the county map.
Ningbo DSS Intelligent Technology Co., Ltd , https://www.dssking.com