![<?echo $_SERVER['SERVER_NAME'];?>](/template/twentyseventeen/skin/images/header.jpg)
It is very difficult to install the manual drying rack . It is necessary to follow the master for several days to learn. Here are some small theories, I hope to help everyone, theory + practice operation is faster! 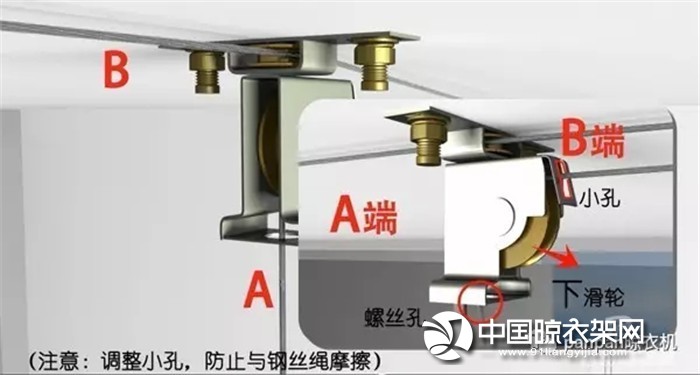
It is roughly divided into five major steps:
First we have to fix it with expansion screws. Secondly, the installation of the top seat: on the top of the wall where the drying rack is installed, use a ruler to measure the diameter of the lighting on the top of the wall, and make the installation mark on the sides of the lamp about 15cm-30cm.
Then measure the distance between the mark and the edge of the balcony, and determine the width of the top seat installation based on this distance.
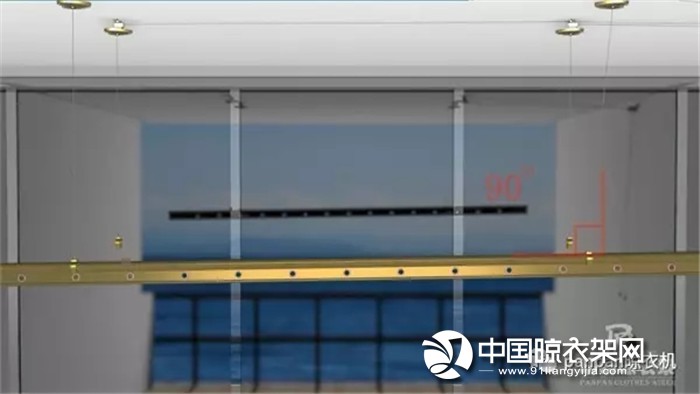
Then measure the length of the balcony with the light as the center. According to the length of the clothes bar, determine that the two sides of the lamp are equally divided into 80cm100cm, and then determine the four intersections. These four intersections are the installation positions of the top seat of the hanger. After the position is determined, drill and fix the four top seats with expansion screws (if the rod length exceeds the conventional size, the distance will be adjusted accordingly).
It is worth noting here that the two top seats on the side of the corner are the movable seats, and the other two top seats are fixed seats. The difference is that the movable seat is two wheels and must be installed in front.
Then install the corner: the corner can be installed on the top of the balcony or the top of the wall. The corner is 50--70cm away from the movable top. It must be triangular (45 degree angle) in the middle of the movable top, and keep the same vertical position with the hand. line. There are no drawings here, please forgive me.
Next is the wire connection: there is two wires in the drying rack. First, one end of the wire passes through the bearing wire groove of the corner, and then passes through the movable wheel bearing wire groove of the movable top seat (located on the upper part of the top seat). Pass the bearing wire groove of the fixed end seat to make the wire perpendicular to the ground, then insert the top cover from the wire and snap the top cover. The other end of the wire also passes through the other hole of the bearing wire slot of the corner, and then passes through the other movable wheel bearing wire groove of the movable seat (below the same top seat), the wire is perpendicular to the ground, and the top cover is inserted from the wire. , card top cover. The other wire is installed in the same way.
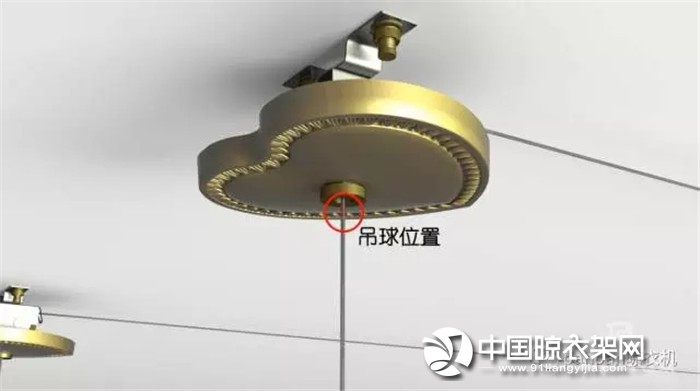
Finally, dry the connection: at the head end of each wire, wear the ball, tie the ball in the hanging ball; then pull the ball to the top seat, then pull the wire from the corner, just into a double strand The wire is stuck at one end of the hand shaker; the wire in the hand shaker is relaxed, the drop ball is lowered, the drying rod is passed through the hanging ball, and the hole of the hanging ball is screwed and fixed, and finally the plug is installed.
Seeing that my head is dizzy, the installation steps of the drying rack will be a bit strange to beginners. Everyone will be in the process of installing in peacetime, I believe it will help everyone.
Editor: China drying rack net - dew for frost
Cloth Pet Toy,Cotton Pet Chew Toy,Cleaning Chew Toy,Dog Molars Teeth Toy
Yangzhou Pet's Products CO.,LTD , https://www.yzpqpets.com